介绍
近来,我一直从事基于GPS的应用程序开发工作,并将其映射到定制的硬件设备上,并且这些设备集成了位置感知组件。 尽管大部分时候我使用Eclips开发,不过尽来Android Studio'的优良特色及操作方便立即吸引了我并开始在工作中使用他。在几周的工作中,我使用 Android Studio 和Google Maps Android API V2, 同时学习了一些课程,这里和大家分享一下。
本篇文章中将重点介绍Google Maps Android API V2的应用程序开发, 使用Android Studio 开发环境. 不久前Google 停止了Maps Android V1 KEY的分配,取之的是开始发放V2. 不少的文档、书籍或其它资源里的教程都有关于v1版的开发例子,恰恰缺少使用 Android Studio 开发这样应用的教程. 希望这里能够弥补.
背景
Google 在2013年5月16号的I/O 大会中公布了 Android Studio 作为他们的集成开发环境, 作为开发安卓应用程序的开发工具(IDE). Android Studio 实质是JetBrains公司的InettliJ IDEA, 但它只专注于Android 应用程序开发. Android Studio 使用Gradle作为依赖性解决,大部分的项目管理任务存在于IDE中. 你可以从 这里下载.. Android Studio 会自动检查你安装的版本,并自动升级. 在写本文里,现在新的版本是: 0.2.11, Build AI-132.855830.
在Android Studio 之前,或将来, 大部分的java开发者使用Eclipse作为安卓程序开发平台. Eclipse是一个很好的平台,提供了java,c++及其它语言的开发。.
创建Android应用
我这里假设读者对 Android 程序的结构已经非常熟悉对像:Activity, Intent, Activity 生命周期及存在的各种状态,资源文件等等. 有很多书籍介绍. 我们在本文中将重点集中在使用特别的工具在特别的程序中。我的Android Studio安装在Linux机器中. 不过该程序在Windows 或Mac machine 中同样高效运行.
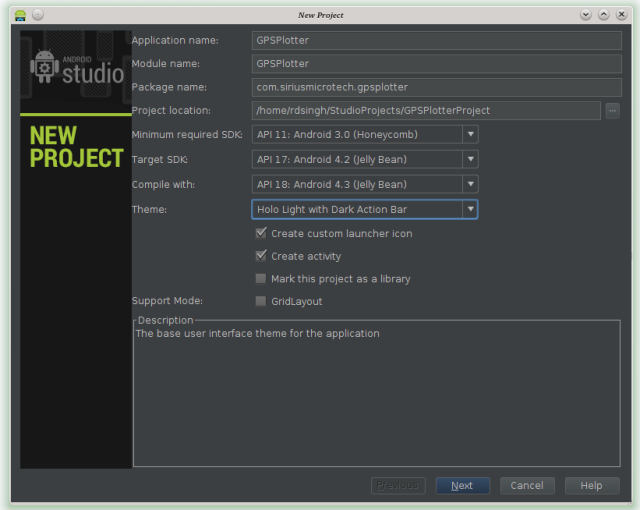
在开始画面里当你选择,New Project 后,将会引导你创建一个android程序框架, 如下周所示. 在Application name一栏填写个有意义的程序名称,如:GPSPlotter. 在package name一栏填写你的程序包名称, 如com.siriusmicrotech.gpsplotter. 它将在下一步审请API Key生成时需要用到的应用程序名。 留意 Minimum required SDK这里选择的是AP11, 因为Google Maps Android API V2 需要AP8 以上版本. 点击下一步按钮,采用默认配置直到完成项目创建。
这是我们创建的程序框架如图.

尽管文件很多,不过我们只关心以下5个文件:
- MainActivity.java
- activity_main.xml
- strings.xml
- AndroidManifest.xml
- build.gradle
$Page_Split$
Location Providers
Before we start to modify these files, let us discuss some background on why we do what we do in the following sections. Android devices are equipped with GPS hardware. Android provides a very straight forward API to access Location information derived from GPS hardware along with Wi-Fi and Cellular network connection sources that helps provide location information. Since an application should be able to access the current location information of the device, we need to get the users permission for the application to access this service during installation. During debugging, the application is given permission to access these services, without prompting the user to acknowledge. The following section sets up various permissions for the application to access such as accessing internet, since Maps are to be downloaded from Internet, accessing Storage, since Maps need to be cached and for accessing Location providers such as GPS and other forms of location services. Android Maps also needs OpenGL. Here are the lines added to our AndroidManifest.xml file just above thetag.
<uses-permission android:name="android.permission.ACCESS_NETWORK_STATE" /> <uses-permission android:name="android.permission.INTERNET" /> <uses-permission android:name="com.google.android.providers.gsf.permission.READ_GSERVICES" /> <uses-permission android:name="android.permission.WRITE_EXTERNAL_STORAGE" /> <uses-permission android:name="android.permission.ACCESS_COARSE_LOCATION" /> <uses-permission android:name="android.permission.ACCESS_FINE_LOCATION" /> <uses-feature android:glEsVersion="0x00020000" android:required="true" />
Using Google Maps Android API V2 in our Code
Since Google Maps Android API V2 is not included in the Android Development Kit (ADK) and instead it is included in the Google Play Services API, we need to install it separately. Fire up SDK manager and go to the Extras section and check against the Google Play Services and Google Repository and click Install Packages.

Once Google Play Services API is installed, we need to include it in our project. The very nice tutorial at Google's android developer site is written targeting Eclipse as the platform, it suggests including a reference to the Google Services Library by Importing it into the workspace. This will not work with Android Studio since Gradle is used for dependency resolution here. So, we need to edit build.gradle file as follows, by adding a single line in the dependency section of it. Please note, as of this writing, the UI can not be used to add this dependency for Gradle. The only way is to edit the build.gradle file manually. However, one must realize that this is much simpler than the solution discussed at the developer's site.
dependencies { // Google Play Services compile 'com.google.android.gms:play-services:3.2.65' // Support Library compile 'com.android.support:appcompat-v7:18.0.0' }
Now, to show a map in our application, we need aFragmentin our layout. This is done by replacing theTextViewsection in the activity_main.xml file with aFragmentsection as follows:
<fragment class="com.google.android.gms.maps.SupportMapFragment" android:id="@+id/map" android:layout_width="match_parent" android:layout_height="match_parent" />
And modifying MainActivity.java by deriving theMainActivityclass fromFragmentActivityinstead ofActivity, as follows:
public class MainActivity extends FragmentActivity
Now, technically we have everything on the device side of the application. However, the Map has to come from the Cloud. To access the Maps from the cloud, we need a special authentication key called API Key, given to our application by the Google Cloud services, where the Maps are served from. Even though it sounds very complicated, it is very straight forward to obtain this key by following the instructions given here
Please note that for our purposes, we can use our debug certificate to obtain our API Key. A release certificate should be used for generating this key, only if we are going to publish the application. Once this key is obtained, copy this key into the AndroidManifest.xml file as follows, just abovetag.
<meta-data android:name="com.google.android.maps.v2.API_KEY" android:value="Your API Key Here!!" />
Please note, it is much simpler to connect an Android device to the PC and install this application on it and test it than to use the Emulator. However, please remember to enable USB debugging on the device. If your device is running Jelly Bean, by default, Developer Options section of the Settings menu is hidden to protect the user from doing any harm with this feature. Go to System Settings Menu and scroll all the way down to see if you see Developer Options listed. If it is not listed, to bring the Developer Options to view, select About Phone menu and scroll all the way down where you see Build Number. Keep tapping on Build Number several times rapidly until you see that Developer Options are enabled. Go into Developer Options menu and enable USB debugging by clicking on the check mark against it.
Connect your device to the PC with the USB cable and hit run on the Android Studio Menu. If everything went well, you would see a Google map displayed centered somewhere around the continent of Africa! That's not much work, is it.
Displaying and following our location on the Map
Displaying a map of the world is not very exciting unless we are able to trace our location on it somehow. Now, let us start using our location services that our application has already applied for permission in the AndroidManifest.xml file earlier on. TheGoogleMapclass provides a neat integration many features, including location tracking. So, the sequence of tasks here are to
- get the object reference for the map we just displayed
- tie up a location listener to this map that responds to location changed events from the location services
- focus our location on the map
We can obtain the map object reference by getting the reference to the Fragment that we inserted in the layout file as follows:
myMap = ((SupportMapFragment) getSupportFragmentManager().findFragmentById(R.id.map))
                    .getMap();
Now, to mark our location on the map, with a blue arrow icon, we enable the feature in our map object as follows. Note, we check for null since the map may not be available before it is rendered completely. -
if(myMap != null)
{
    myMap.setMyLocationEnabled(true);
}
Since we now have the object reference for the map, we can now start to listen to the location updates from location services. The recommended method for doing this is to setup a location client for the location services within our Main Activity with the following code
myLocationClient = new LocationClient(getApplicationContext(), this, this); // once we have the reference to the client, connect it if(myLocationClient != null)
  myLocationClient.connect();
TheLocationClientobject constructor takes three parameters, the first is the application context and the second is the object that implements Connection callbacks, such as establishment of connection and Disconnection, and the third is the object that implements Connection failure listener. Since we pass the reference to theMainActivityobject as the two call back inputs, we have to implement those methods in ourMainActivityclass. Once we modify ourMainActivityclass definition line as follows to implement those two interfaces and theLocationListenerinterface. Android Studio will prompt us to implement the required methods and will automatically populate our class with the methods.
public class ShowMeOnMap extends FragmentActivity implements GooglePlayServicesClient.ConnectionCallbacks,
        GooglePlayServicesClient.OnConnectionFailedListener,
        com.google.android.gms.location.LocationListener{
The following are the methods that are populated by Android Studio to implement those three interfaces:
@Override
    public void onConnected(Bundle bundle) {
}

@Override
public void onDisconnected() {

}

@Override
public void onLocationChanged(Location location) {

}

@Override
public void onConnectionFailed(ConnectionResult connectionResult) {

}
As the names suggests,OnConnectedis fired when the the service is connected to ourLocationClientobject. Here is where we have to register ourLocationListenerto listen for location updates. So, we edit this method body as follows
@Override public void onConnected(Bundle bundle) {
   myLocationClient.requestLocationUpdates( REQUEST, this);
}
As you already know, thethisin therequestLocationUpdatescall is the reference to ourMainActivitysince we are implementing theLocationListenerInterface here. The first parameter is theLocationRequestobject that sets options for the location updates such as update frequency, accuracy etc. This is defined as follows:
private static final LocationRequest REQUEST = LocationRequest.create()
            .setInterval(5000) // 5 seconds  .setFastestInterval(16) // 16ms = 60fps  .setPriority(LocationRequest.PRIORITY_HIGH_ACCURACY);
In this application, we do not do anything foronDisconnected()andonConnectionFailed()methods and we leave them alone.
Once all these are setup, we are now ready to update our location on the map whenever we receive a new location update from the Location service through theonLocationChanged(Location location)method that we registered with theLocationClient.OnLocationChangedis called back with Location parameter that gives as our current location. To move our map to show our current location (or any other location) in the view. The map view is modeled as a camera looking down on a flat plane. The position of the camera (and hence the rendering of the map) is specified by latitude, longitude, zoom, tilt, and bearing of the location to be shown. So, to show a given location on map, we update the camera to that location. The safest way to move camera to our location is to usemoveCamera()method in theGoogleMapclass with callbacks as follows. The callbacks prevent the situation where the map is not rendered completely and we are attempting to update the camera.
myMap.moveCamera(CameraUpdateFactory.newCameraPosition( new CameraPosition.Builder().target(new LatLng(lat, lng))
        .zoom(15.5f)
        .bearing(0)
        .tilt(25)
        .build()
), new GoogleMap.CancelableCallback() {
    @Override public void onFinish() { // Your code here to do something after the Map is rendered  }

    @Override public void onCancel() { // Your code here to do something after the Map rendering is cancelled  }
});
In essence, what we have done so far should result in an application that loads a map and shows our position on it with a blue arrow. This icon will track our location on the map as we move around. However, we have neglected some of the details, for the sake of simplicity here. For instance, we have neglected the life cycle events of theMainActivitywhere is could be Paused and Resumed etc. In the event of another activity displayed over ourMainActivity, preventing it from displaying, ourMainActivitywill be Paused and sent to the background and anonPause()event is generated. When the user gets back to our activity, it will be Resumed and anonResume()event is generated. Location updates are expensive in terms of battery life. So, as a responsible citizen of the Android application habitat, our application should disable location updates when sent to background and not displayed and enable back again when resumed. This is done by overridingonPause()andonResume()methods of theMainActivity. Please refer to the complete application in the source code bundle.
To use the source code and create an application for your own, please follow these steps:
- Unzip the source in a folder
- Since Creating API key needs an application name, follow what we said in this article, starting with creating new project in Android Studio, with your preferred application name.
- Then copy the contents of MainActivity.java from the source you unzipped and paste it in your new MainActivity.java completely replacing the contents. Then go over to the very first line in the file and change the line "package com.siriusmicrotech.gpsplotter with your package name that you used during your new project creation.
- Copy the contents of activity_main.xml file from the source you unzipped and paste it in your new activity_main.xml file replacing the contents entirely.
- Copy and paste contents of build.gradle file from unzipped source on to your new buld.gradle file replacing contents entirely.
- Do the same for AndroidManifest.xml file. However, here, you have to change the third line from top to replacecom.siriusmicrotech.gpsplotterwith your package name and under thetag, changeandroid:name="com.siriusmicrotech.gpsplotter.MainActivity"with your activity name.
- Get your API key from Google Could Services
- Copy and paste your API key in the AndroidManifest.xml file to replace string that reads "Your API Key Here!"
- That's it.
Points of Interest
Things to pay attention to - Get the latest version of Android Studio build. If you decided to use Android Studio, do not research on the internet for solutions, since almost all the text is written for Eclipse. There is a significant change in the way things are done in Google Maps Android API V2 than it was done in V1. Most of the text in elsewhere in internet are written with reference to V1 and that would cripple your progress real bad. The solution is to head over to Google Developer site for API V2 and you will be much better off.
 鲁公网安备 37010302000477号